Pittman #21 Titan

Show Off Your Finished Sprint Cars

Moderator: sigmaman

kapam
Posts: 284
Joined: Sun Nov 16, 2008 5:46 pm

Pittman #21 Titan

Post by kapam »

Once again, improved pics.
Hope you like 'em.....
ImageImageImage

User avatar
Bear
Posts: 118
Joined: Sun Nov 16, 2008 3:51 am
Location: Adelaide, Australia

Re: Pittman #21 Titan

Post by Bear »

Very nice, love the seat, got any pics of the seat and the engine??
GO HARD OR GO HOME!

User avatar
smoke fan
Posts: 437
Joined: Wed Nov 04, 2009 9:20 pm
Location: Calgary, Alberta, Canada

Re: Pittman #21 Titan

Post by smoke fan »

Another terrific build! Nascar seat? very clean build, almost looks real!
Grant

User avatar
Joe
Posts: 1260
Joined: Wed Sep 24, 2008 8:17 pm
Location: Indiana
Contact:

Re: Pittman #21 Titan

Post by Joe »

Both very nice!
Joe
Making your Sprint Car model dreams come true since 2004!
Image
Facebook- ScaleSprints.com Twitter- @ScaleSprints

User avatar
sigmaman
Posts: 861
Joined: Sat Nov 08, 2008 5:24 pm
Location: Adelaide,South Australia
Contact:

Re: Pittman #21 Titan

Post by sigmaman »

Very nice Andrew. Nice to see this one again.
http://www.sigmamansmodels.com
http://www.thepartsbox.com
the place to find resin sprintcar parts
http://www.mooreair.com.au
Commercial vehicle air conditioning and refrigeration specialists!

Geoff
Posts: 668
Joined: Tue Sep 30, 2008 9:43 pm
Location: Ocean Grove, Victoria, Australia

Re: Pittman #21 Titan

Post by Geoff »

Sweeeeet, love the dirt on the tyres......

kapam
Posts: 284
Joined: Sun Nov 16, 2008 5:46 pm

Re: Pittman #21 Titan

Post by kapam »

Bear wrote: got any pics of the seat and the engine??
The seat is scratch-built - or perhaps "kit-bashed" is a more appropriate term.
Here's a photo before paint:
Image
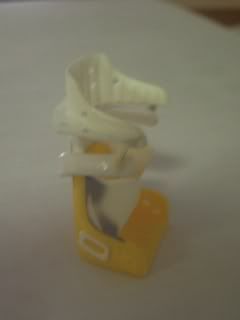
What (I hope) you can see is the bottom is a standard kit seat with extra chest bracing added from scrap plastic.
Attached to the top of that is part of another kit seat (with the bottom cut off and part of the top cut off). A horizontal "flange" is cut to match the curve of the head restraint.
The shoulder braces are made from those pieces that brace the chassis when it's in the box (removed during assembly).
I bent them to shape with a little heat from a cigarette lighter. Small pieces of bent "Evergreen" rod connect the shoulder padding to the head restraint.
I drilled a few weight-reduction holes for added effect. And after painting it looks like this:
Image
Self-adhesive felt (from a craft store) is used as padding for the seat and head restraint.

User avatar
Hursty
Posts: 643
Joined: Fri May 15, 2009 8:23 pm
Location: Korumburra, Victoria, Australia

Re: Pittman #21 Titan

Post by Hursty »

Awesome work! Love the seat, thanks for the how to.
The RR beadlock, where did that come from?

kapam
Posts: 284
Joined: Sun Nov 16, 2008 5:46 pm

Re: Pittman #21 Titan

Post by kapam »

Thanks for the nice comments! :)
The beadlock is simply "Evergreen"sheet, cut out using a circle template (from the old drawing board days).
I use a compass point to score the plastic 'til it separates.
The inner circle is also scored using the compass point - add a wash (I use an acrylic black) to highlight the line.
The "bolts" are from a photo-etch sheet, or hunt down some glitter from a craft shop. Look for some that is a consistent circular or hex shape.
One packet of glitter would last you for a thousand years! :lol:

User avatar
Bear
Posts: 118
Joined: Sun Nov 16, 2008 3:51 am
Location: Adelaide, Australia

Re: Pittman #21 Titan

Post by Bear »

Thanks, will have to give that a go. The glitter idea is priceless,who would've thought?? Thanks heaps :D
GO HARD OR GO HOME!

Post Reply